大数据学习
bigdata learning
Toggle navigation
大数据学习
主页
openGauss数据库
Flume
MongoDB
Hadoop
数据库实验
Kafka
Zookeeper
Hbase
Manual
Spark
Neo4j
InfluxDB
RabbitMQ
Flink
About Me
归档
标签
13-Flume案例-自定义Interceptor
Flume
2022-09-27 17:22:02
39
0
0
bigdata
Flume
# Flume案例-自定义Interceptor ## 1)案例需求: 使用 Flume 采集服务器本地日志,需要按照日志类型的不同,将不同种类的日志发往不同的分析系统。 ## 2)需求分析: 在实际的开发中,一台服务器产生的日志类型可能有很多种,不同类型的日志可能需要发送到不同的分析系统。此时会用到 Flume 拓扑结构中的 Multiplexing 结构, Multiplexing的原理是,根据 event 中 Header 的某个 key 的值,将不同的 event 发送到不同的 Channel中,所以我们需要自定义一个 Interceptor,为不同类型的 event 的 Header 中的 key 赋予不同的值。 在该案例中,我们以端口数据模拟日志,以数字(单个)和字母(单个)模拟不同类型的日志,我们需要自定义 interceptor 区分数字和字母,将其分别发往不同的分析系统(Channel)。 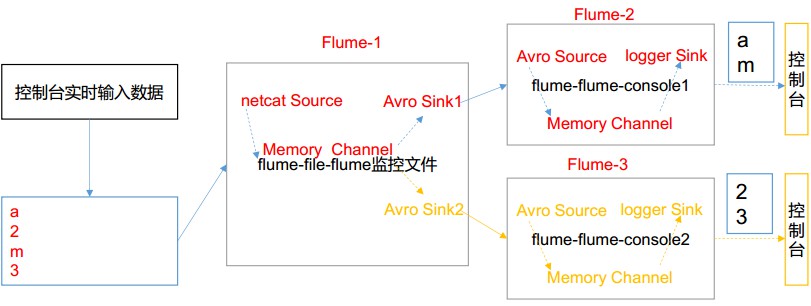 ## 3)实现步骤: ### 1.创建一个 maven 项目,并引入以下依赖。 ```xml <dependencies> <dependency> <groupId>org.apache.flume</groupId> <artifactId>flume-ng-core</artifactId> <version>1.7.0</version> </dependency> </dependencies> ``` ### 2.定义 CustomInterceptor 类并实现 Interceptor 接口。 ```java package org.nbubigdata.flume; import org.apache.flume.Context; import org.apache.flume.Event; import org.apache.flume.interceptor.Interceptor; import java.util.List; public class CustomInterceptor implements Interceptor { @Override public void initialize() { } @Override public Event intercept(Event event) { byte[] body = event.getBody(); if (body[0] < 'z' && body[0] > 'a') { event.getHeaders().put("type", "letter"); } else if (body[0] > '0' && body[0] < '9') { event.getHeaders().put("type", "number"); } return event; } @Override public List<Event> intercept(List<Event> events) { for (Event event : events) { intercept(event); } return events; } @Override public void close() { } public static class Builder implements Interceptor.Builder { @Override public Interceptor build() { return new CustomInterceptor(); } @Override public void configure(Context context) { } } } ``` ### 3.编辑 flume 配置文件 配置/usr/local/flume/job/interceptor/a1.conf, 包括 1 个 netcat source, 1个sink group(2 个 avro sink),并配置相应的 ChannelSelector 和 interceptor。 ```bash # Name the components on this agent a1.sources = r1 a1.sinks = k1 k2 a1.channels = c1 c2 # Describe/configure the source a1.sources.r1.type = netcat a1.sources.r1.bind = localhost a1.sources.r1.port = 44444 a1.sources.r1.interceptors = i1 a1.sources.r1.interceptors.i1.type = org.nbubigdata.flume.CustomInterceptor$Builder a1.sources.r1.selector.type = multiplexing a1.sources.r1.selector.header = type a1.sources.r1.selector.mapping.letter = c1 a1.sources.r1.selector.mapping.number = c2 # Describe the sink a1.sinks.k1.type = avro a1.sinks.k1.hostname = localhost a1.sinks.k1.port = 4141 a1.sinks.k2.type=avro a1.sinks.k2.hostname = localhost a1.sinks.k2.port = 4242 # Use a channel which buffers events in memory a1.channels.c1.type = memory a1.channels.c1.capacity = 1000 a1.channels.c1.transactionCapacity = 100 # Use a channel which buffers events in memory a1.channels.c2.type = memory a1.channels.c2.capacity = 1000 a1.channels.c2.transactionCapacity = 100 # Bind the source and sink to the channel a1.sources.r1.channels = c1 c2 a1.sinks.k1.channel = c1 a1.sinks.k2.channel = c2 ``` 配置/usr/local/flume/job/interceptor/a2.conf 用于接收单词,包括1个 avro source 和1个 logger sink。 ```bash a1.sources = r1 a1.sinks = k1 a1.channels = c1 a1.sources.r1.type = avro a1.sources.r1.bind = hadoop103 a1.sources.r1.port = 4141 a1.sinks.k1.type = logger a1.channels.c1.type = memory a1.channels.c1.capacity = 1000 a1.channels.c1.transactionCapacity = 100 a1.sinks.k1.channel = c1 a1.sources.r1.channels = c1 ``` 配置/usr/local/flume/job/interceptor/a3.conf 用于接收数字,包括1个 avro source 和1个 logger sink。 ```bash a1.sources = r1 a1.sinks = k1 a1.channels = c1 a1.sources.r1.type = avro a1.sources.r1.bind = hadoop104 a1.sources.r1.port = 4242 a1.sinks.k1.type = logger a1.channels.c1.type = memory a1.channels.c1.capacity = 1000 a1.channels.c1.transactionCapacity = 100 a1.sinks.k1.channel = c1 a1.sources.r1.channels = c1 ``` ### 4.启动 flume 进程 分别在三个终端启动a1, a2, a3 a1终端 ```bash nbu@ecs:/usr/local/flume$bin/flume-ng agent --conf conf/ --name a1 --conf-file job/interceptor/a1.conf ``` a2终端 ```bash nbu@ecs:/usr/local/flume$bin/flume-ng agent --conf conf/ --name a2 --conf-file job/interceptor/a2.conf -Dflume.root.logger=INFO,console ``` a3终端 ```bash nbu@ecs:/usr/local/flume$bin/flume-ng agent --conf conf/ --name a3 --conf-file job/interceptor/a3.conf -Dflume.root.logger=INFO,console ``` 另外开启一个终端,用netcat 连接并输入数字和单词 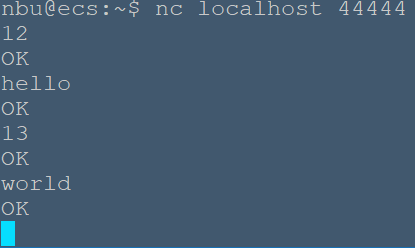 在a2终端中可以看到单词 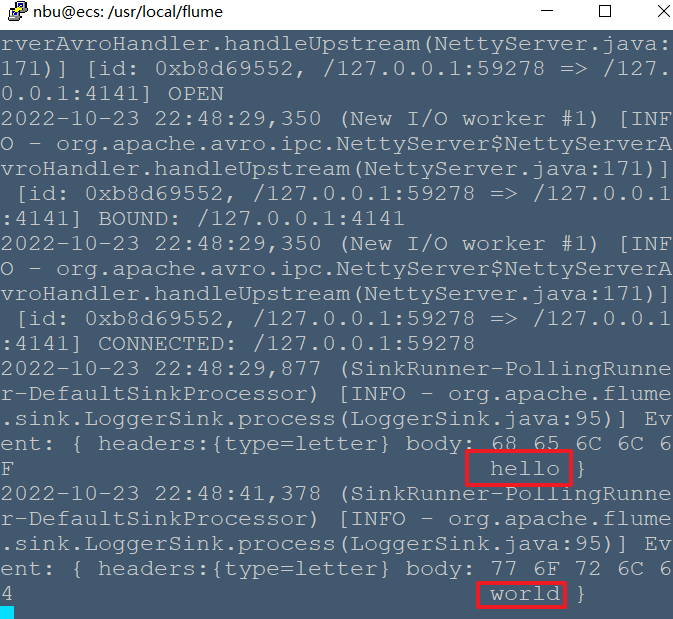 在a3终端中可以看到数字 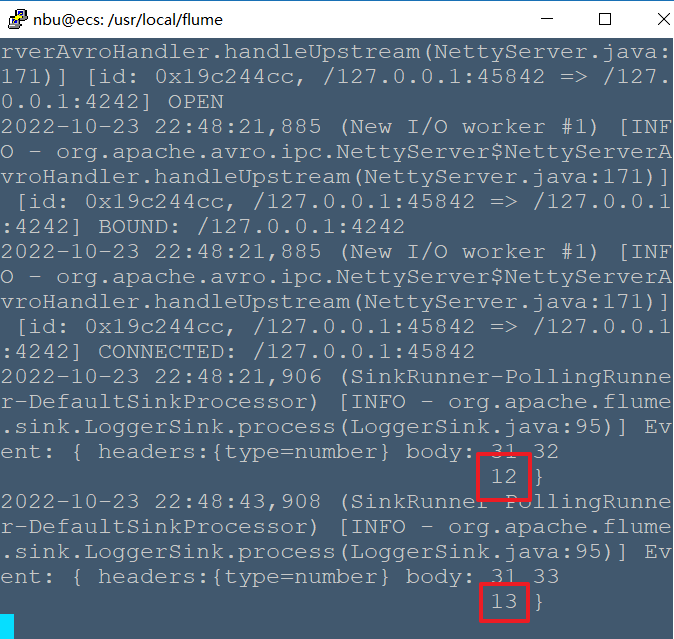 分别在 hadoop102, hadoop103, hadoop104 上启动 flume 进程,注意先后顺序。 在 hadoop102 使用 netcat 向 localhost:44444 发送字母和数字。观察 hadoop103 和 hadoop104 打印的日志。
上一篇:
13 行写入协议
下一篇:
14-Flume案例-Ganglia的安装与部署
文档导航

 浙ICP备案2024056857号
 浙公网安备33020502001085号