大数据学习
bigdata learning
Toggle navigation
大数据学习
主页
openGauss数据库
Flume
MongoDB
Hadoop
数据库实验
Kafka
Zookeeper
Hbase
Manual
Spark
Neo4j
InfluxDB
RabbitMQ
Flink
About Me
归档
标签
09-Flume案例-负载均衡和故障转移
Flume
2022-09-27 17:19:39
24
0
0
bigdata
Flume
# Flume案例-负载均衡和故障转移 ## 1)案例需求: 使用 Flume1 监控一个端口,其 sink 组中的 sink 分别对接 Flume2 和 Flume3,采用FailoverSinkProcessor,实现故障转移的功能。 ## 2)需求分析: 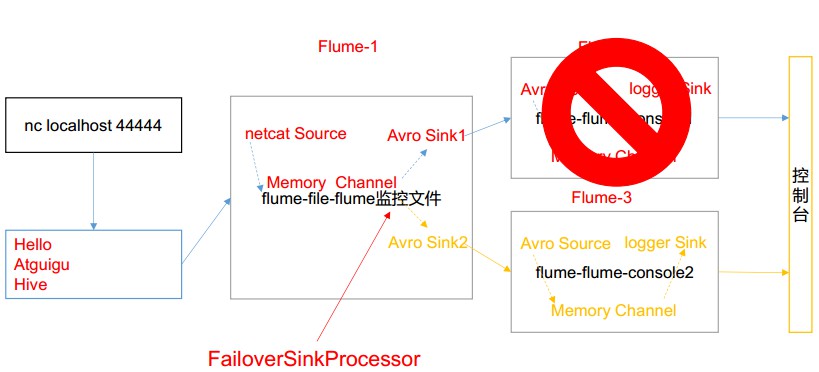 ## 3)实现步骤: ### 1.准备工作 在/opt/module/flume/job 目录下创建 group2 文件夹 ```bash nbu@ecs:~$ cd /usr/local/flume/job nbu@ecs:/usr/local/flume/job$ mkdir group2 ``` ### 2.创建 flume-netcat-flume.conf 配置 1 个 netcat source 和 1 个 channel、 1 个 sink group(2 个 sink),分别输送给 flumeflume-console1 和 lume-flume-console2。 编辑配置文件 ```bash nbu@ecs:/usr/local/flume/job/group2$ vim flume-netcat-flume.conf ``` 添加如下内容: ```bash # Name the components on this agent a1.sources = r1 a1.channels = c1 a1.sinkgroups = g1 a1.sinks = k1 k2 # Describe/configure the source a1.sources.r1.type = netcat a1.sources.r1.bind = localhost a1.sources.r1.port = 44444 a1.sinkgroups.g1.processor.type = failover a1.sinkgroups.g1.processor.priority.k1 = 5 a1.sinkgroups.g1.processor.priority.k2 = 10 a1.sinkgroups.g1.processor.maxpenalty = 10000 # Describe the sink a1.sinks.k1.type = avro a1.sinks.k1.hostname = localhost a1.sinks.k1.port = 4141 a1.sinks.k2.type = avro a1.sinks.k2.hostname = localhost a1.sinks.k2.port = 4142 # Describe the channel a1.channels.c1.type = memory a1.channels.c1.capacity = 1000 a1.channels.c1.transactionCapacity = 100 # Bind the source and sink to the channel a1.sources.r1.channels = c1 a1.sinkgroups.g1.sinks = k1 k2 a1.sinks.k1.channel = c1 a1.sinks.k2.channel = c1 ``` ### 3.创建 flume-flume-console1.conf 配置上级 Flume 输出的 Source, 输出是到本地控制台。 编辑配置文件: ```bash nbu@ecs:/usr/local/flume/job/group2$ vim flume-flume-console1.conf ``` 添加如下内容: ```bash # Name the components on this agent a2.sources = r1 a2.sinks = k1 a2.channels = c1 # Describe/configure the source a2.sources.r1.type = avro a2.sources.r1.bind = localhost a2.sources.r1.port = 4141 # Describe the sink a2.sinks.k1.type = logger # Describe the channel a2.channels.c1.type = memory a2.channels.c1.capacity = 1000 a2.channels.c1.transactionCapacity = 100 # Bind the source and sink to the channel a2.sources.r1.channels = c1 a2.sinks.k1.channel = c1 ``` ### 4.创建 flume-flume-console2.conf 配置上级 Flume 输出的 Source, 输出是到本地控制台。 编辑配置文件: ```bash nbu@ecs:/usr/local/flume/job/group2$ vim flume-flume-console2.conf ``` 添加如下内容: ```bash # Name the components on this agent a3.sources = r1 a3.sinks = k1 a3.channels = c2 # Describe/configure the source a3.sources.r1.type = avro a3.sources.r1.bind = localhost a3.sources.r1.port = 4142 # Describe the sink a3.sinks.k1.type = logger # Describe the channel a3.channels.c2.type = memory a3.channels.c2.capacity = 1000 a3.channels.c2.transactionCapacity = 100 # Bind the source and sink to the channel a3.sources.r1.channels = c2 a3.sinks.k1.channel = c2 ``` ### 5.执行配置文件 分别开启对应配置文件: flume-flume-console2, flume-flume-console1, flume-netcatflume。 ```bash nbu@ecs:/usr/local/flume/job/group2$ cd ../.. nbu@ecs:/usr/local/flume$ bin/flume-ng agent --conf conf/ --name a3 --conf-file job/group2/flume-flume-console2.conf -Dflume.root.logger=INFO,console nbu@ecs:/usr/local/flume$ bin/flume-ng agent --conf conf/ --name a2 --conf-file job/group2/flume-flume-console1.conf -Dflume.root.logger=INFO,console nbu@ecs:/usr/local/flume$ bin/flume-ng agent --conf conf/ --name a1 --conf-file job/group2/flume-netcat-flume.conf ``` ### 6.使用 netcat 工具向本机的 44444 端口发送内容 ```bash nbu@ecs:~$ nc localhost 44444 ``` ### 7.查看 Flume1 及 Flume23 的控制台打印日志 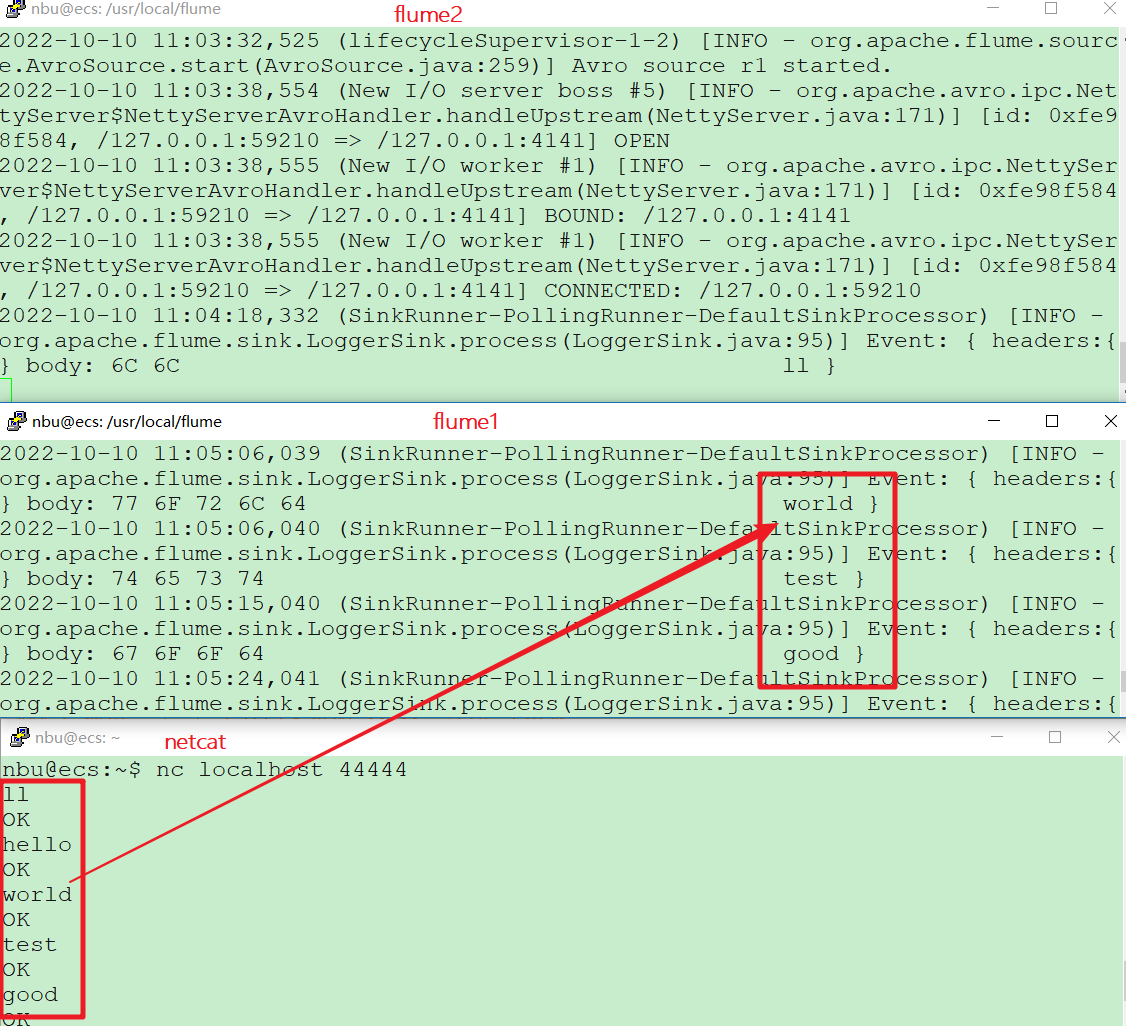 ### 8.将 Flume1 中断或kill,观察 Flume2 的控制台打印情况。 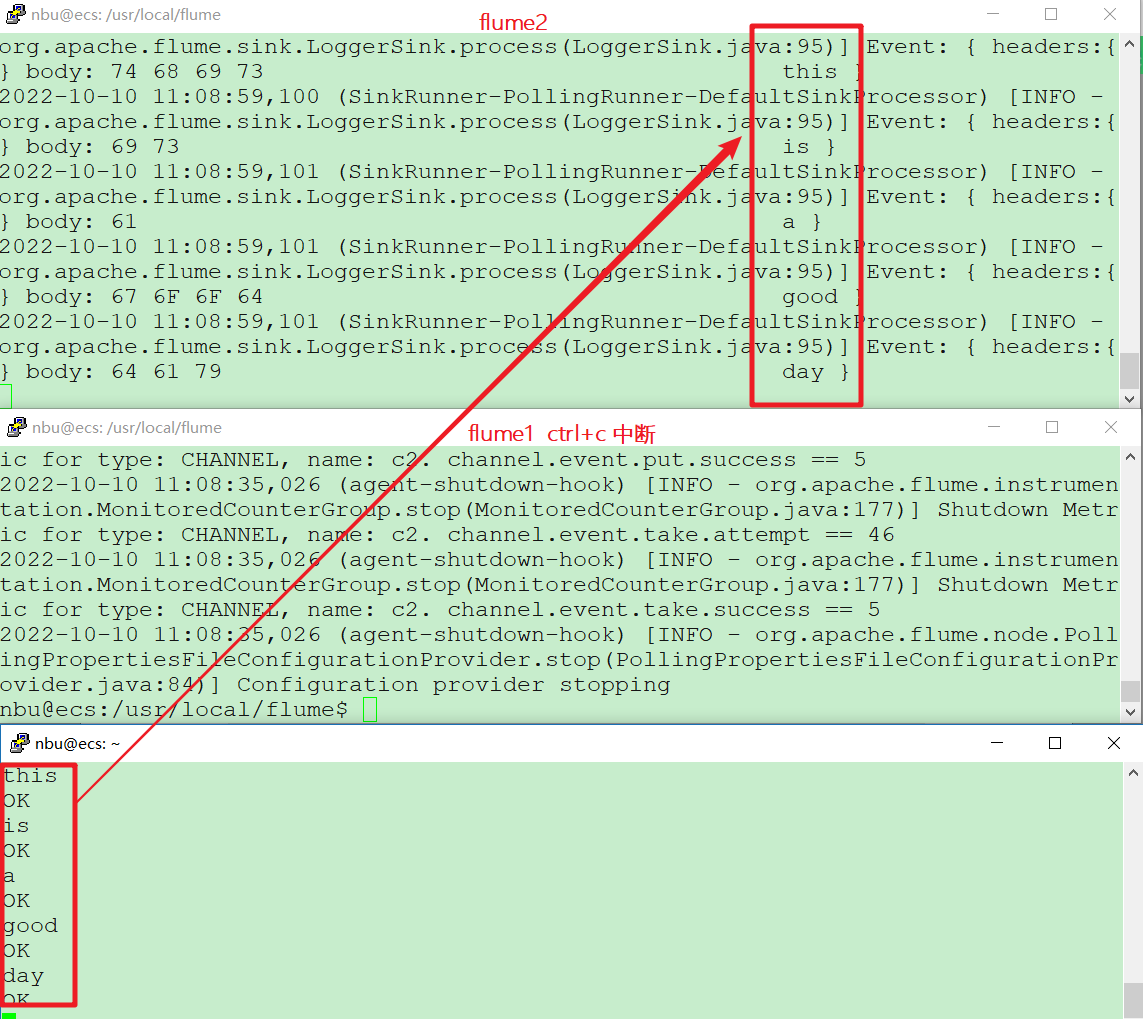 > 注:使用 jps -ml 查看 Flume 进程。
上一篇:
09 Linux常用命令
下一篇:
09-InfluxDB函数
文档导航

 浙ICP备案2024056857号
 浙公网安备33020502001085号